Monday, May 31, 2010

Mushrooms


I know this blog is mainly about sweets, but hey we all have to eat real food some time right? Well i'm really having an urge to make my favorite stuffed mushrooms. These mushrooms are so delicious, and very versatile. The recipe can be altered in a number of ways. Its great as an appetizer in which case you use button mushrooms. Or you can go along with the recipe and serve this as your main course, or a side dish. Anyway you choose these are so yummy, there also pretty healthy, oh yeah AND their vegan. For all you non-vegans out there please don't let that frighten you away (remember when there's a vegan product in something such as soy cheese, you can always use the real thing).

Now my personal preference for this recipe is to use the small button mushrooms, as i've always served this as more of an appetizer/or side dish.


Ingredients:
    2 Tbsp. olive oil
    8 large flat mushrooms; or 1 container button mushrooms
    1 chopped onion
    1 crushed garlic clove
    1/4 cup rolled oats
    1 8-oz. can chopped tomatoes with herbs
    1 tsp. hot pepper sauce
    1/4 cup pine nuts; just roughly chopped
    1/2 cup soy parmesean (or real parmesean)
Directions:
1.) Preheat the oven to 375°F.
2.) Use a small amount of oil to grease a shallow baking dish large enough to hold a single layer of the mushroom caps and set aside (i use 13x9).
3.) Remove the mushroom stalks then chop them, and set the caps aside.
4.) Sauté the onion, garlic, and mushroom stalks in the oil until lightly browned. Stir in the oats and sauté for another minute. Then add the tomatoes and hot sauce.
5.) Arrange the caps with the hole side up in the prepared baking dish. Divide the stuffing mixture between the mushrooms and layer on the nuts and soy cheese.
6.) Bake for 25 minutes, should be served warm.


Now if i do decide to make these i'll definitely upload some pictures later.

Hope everyone has a great memorial day!

Friday, May 28, 2010

peanut butter chocolate chip cookies

This is a great peanut butter cookie recipe from good housekeeping cookbook that i jazzed up a bit by adding some chocolate chips, and some other various adjustments. These would be a great treat to take along to any parties for memorial day weekend. There simple, but definitely a crowd pleaser.


Ingredients:
2 1/2 cups all-purpose flour
1 cup creamy peanut butter
2/3 cup honey
1/2 tsp vanilla extract
1/2 cup sugar
1/2 cup butter; softened
2 eggs
1/2 tsp baking powder
1 cup chocolate chips (more of less depending on how much you like chocolate)

Directions:
1. Preheat oven to 350F, Then cream together the butter and sugar, add peanut butter, eggs, honey, and vanilla mix until combined. (make sure to scrape the bowl with a spatula, to ensure incorporation of all ingredients) Then add in the flour and baking powder, mixing until just combined. Then mix in chocolate chips.
2. Shape cookies into 1-inch balls and place 3-inches apart on cookie sheet (i like to line mine with parchment paper, that way the cookies just slide off, and clean-ups a breeze).
3. Flatten each cookie a bit with hand (or the back of a measuring cup works good; just have a little flour on it though if it begins to stick).
4. Bake 10 minutes (or until edges are lightly browned); rotating halfway through.


Heres the cookie balls before i flattened them (i forgot to take a pic after i flattened them)


And here they are after being baked


And just before there about to be devoured.....


......enjoy :))

Tuesday, May 25, 2010

plated desserts part 2

Here are some more plated desserts, these were some we did in level 3. Both of the plated desserts were made using pate a bric. Pate a bric is sort of like fillo dough, except its thicker and much less fragile. Its actually very flexible, which is how it's able to be rolled and folded into these shapes. It comes frozen in packs of circular disks, so its very handy.


This first dessert i wasn't to crazy about, i thought it was pretty ugly, and it didn't taste very good either.

It's a mango beggars purse (a disk of ginger cake inside and a ginger mango compote inside the pate a bric dough) it's served with a ginger sake sabayon (which was torched) and a lychee nut sorbet in a pate a bric cup. The little people decoration is also made from the pate a bric dough.


This next dessert was actually probably one of my favorite things we made. It was soooo good!

So here it is asian pear spring rolls served with a raspberry creme fraiche ice cream (in pate a bric cup), a champagne raspberry gastrique (also in a pate a bric cup) with little caramel chopsticks for decoration. All of this is served on top of a banana leaf.

A short definition for a gastrique is basically a sauce thats a caramel vinegar reduction, sounds weird but its actually quite tasty.

Sunday, May 23, 2010

Petit Fours

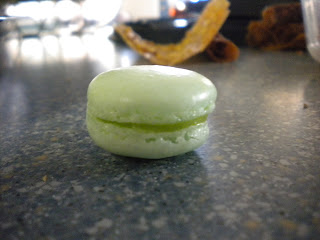
Today i decided to post some pictures of some petit fours i made for a party. The trays were composed of key lime macaroons, raspberry macaroons, and almond tuille cookies.

traditional french macaroons are a baked merinque-like cookie that has been piped, baked, and then filled with ganache, buttercream, jam, or curd. Then another cookie is sandwiched on top.


The key lime macaroons is a simple almond macaroon cookie, colored with just a touch of green food coloring, then filled with a key lime curd.


The raspberry macaroons are made with the same almond macaroon cookie, only it is dyed pink, and filled with raspberry jam.


The almond tuille cookies, are made from a very simple batter with granulated almonds mixed in. Place small rounds on a silpat (they need a lot of room because the spread alot. When they are done baking you must immediately roll them into their "cigar" shape. This must be done while they are hot, because when they cool they harden. If they cool too fast you can place them back in the oven for a minute to soften them up.


Heres a great book on macaroons

Friday, May 21, 2010

Chiboust

Here are some more photos of plated desserts. All of these are chiboust's, chiboust is pastry cream that has been lightened with either whipped cream, or stiffly beaten egg whites.

Chiboust can be used as a dessert on its own, mixed with fruit, or used as a filling in cake or cream puffs.


This first one is a coconut chiboust that has been baked, then dusted with powdered sugar, with it is a chocolate sauce, and a vanilla creme anglaise (vanilla cream sauce).


This one is also a coconut chiboust, however this one has been sprinkled with sugar an then torched. Its also paired with a chocolate sauce, and vanilla creme angaise. Its also served with a chocolate sorbet (delicious!!!!).


This last one is a lemon chiboust that has been torched, its served with a lemon & thyme sauce, crystalized thyme, and a rosette of raspberry sorbet.

Wednesday, May 19, 2010

Banana Cream Pie Cupcakes

Today i figured i would post the recipes, and procedures i used to make these banana cream pie cupcakes. These were just an idea i had the other night and decided to experiment with it a bit. The results were delicious, these could possibly be my new favorite cupcakes!


Banana Cake Recipe
Ingredients:
1/2 cup butter
1 1/2 cups sugar
2 large eggs, beaten
2 cups flour, sifted
1/2 tsp. of salt
1/4 tsp. baking powder
1/2 cup milk
1/4 tsp. vanilla
3/4 tsp. baking soda (add to pureed bananas)
3 very well mashed bananas, very ripe

Directions:
1. Preheat oven to 350 degrees. Like cupcake pan/muffin tin with paper liner, Then mash bananas and mix in baking soda and vanilla with them.
2. Cream butter, sugar until light and fluffy, then slowly beat in the eggs, until mixture is smooth.
3. Sift flour, then add the salt and baking powder to the flour (use a whisk to stir this mix to ensure even distribution of the baking powder).
4. To the creamed butter mixture, add the milk and flour (alternating, beginning and ending with flour).
5. Add in the banana mixture, mix until incorporated
6. Fill pan, bake 16-20 min,rotating pan halfway through.

After the cupcakes have completely cooled, take a pastry tip (if you don't have one, you might be able to use an apple corer, be creative i'm sure you can figure out something.) cut out a hole in the center of each cupcake, just don't go all the way to the base of the cupcake. You can then use the tip to try to widen the hole a bit.


Here is a photo after making the hole


Now its time for the filling, this can be made up to a day in advance. I simply used jell-o vanilla instant pudding mix, because thats what i associate banana cream pie with. Simply follow the instructions on the package (however i did use cream instead of milk, and i used about 1/2 cup less than they said so the pudding would be extra thick. However you could always make pastry cream, if you're not to keen on the pudding idea. Here is a good simple recipe for pastry cream.

Vanilla Pastry Cream
Ingredients
  • 2 cups milk
  • 1/2 cup white sugar
  • 1 vanilla bean, halved lengthwise
  • 6 egg yolks
  • 4 tablespoons all-purpose flour
  • 4 tablespoons unsalted butter
  • 1 pinch salt

Directions:
  1. Place the milk, half the sugar and the vanilla bean in a saucepan over medium heat.
  2. Combine the egg yolks and the remaining sugar in a bowl and whisk until light in color. Add in the flour and the salt, mix to combine.
  3. When the milk just begins to boil, remove from heat and remove vanilla bean. Very slowly dribble the hot milk into the yolk mixture, stirring all the time. When about half of the milk has been added, place all of the yolk mixture into the saucepan over medium heat. Using a spatula or a whisk, mix the pastry cream as it heats, making sure to reach all of the corners of the pan when you stir. Bring the mixture to a boil. Let boil for about 1 minute, stirring constantly. The mixture will be thick.
  4. Remove from heat and add the butter. Strain if you wish for a smoother cream. Place into a bowl and cover directly with plastic wrap to stop a skin from forming on the cream. Chill

So once your filling is chilled and set, fill a pastry bag with a round tip small enough to fit in the hole of the cupcakes. Or you can simply cut the tip of the pastry bag to the desired size. Then simply fill all your cupcakes, below is a photo of this. If your wondering what the pink is on the bag, well thats duct tape, as i was filling the bags the bag burst open so i quick grabbed the first tape i could find to repair the bag.


Now it's time for the icing

Vanilla Confectioners Frosting
Ingredients:
453g (1 box) confectioners sugar
1 cup (226g) unsalted butter; softened
1 tsp vanilla extract
4 tablespoons cream or milk


Directions:
1. Cream the butter until it is light and fluffy
2. Then mix in the vanilla, followed by the confectioners sugar. Start beating on a low speed just until it is incorporated (you don't want sugar flying everywhere), then turn up the speed and beat until no lumps remain and mix is light and fluffy.
3. Finally beat in the 4 tablespoons cream or milk, more may be added until the desired consistency is reached. It shouldn't be runny, but it should be soft enough for easy piping.


When you've made your frosting simply fill your pastry bag that has been fitted with the tip you want (i personally like a large star tip) and pipe away!
Sorry no picks of me piping i couldn't manage to do that and take a pick at the same time.

The way i piped these cupcakes was using a large star tip, start out in the center with the tip held just a bit away from the cupcake, and with even force start piping and moving in a circular motion while moving farther away from the cupcake. Then to get that peak, simply stop squeezing and gently pull away. (I know that sounds confusing but hope it helps somewhat).

Then for the Finishing touch some graham cracker crumbs sprinkled on top


Heres a pic of the final cupcakes


Heres a photo of the inside of the cupcake

Tuesday, May 18, 2010

plated desserts part 1


Today i figured i'd share some pictures of some of the plated desserts i did in school. Plated desserts is basically when you have a dessert that has usually been plated in some decorative manner, and has accompaniments such as sauces, sorbets, ice creams, etc.

There are a lot of components to make up every plated dessert, which is what makes them seem so daunting to some. However usually in the end, it's quite worth it.

All of these were from our first section of plated desserts (we had three)

This first plated dessert was orange crepes, filled with an orange pastry cream, litghtly dusted with powdered sugar and topped with fresh orange segments. It was accompanied by a simple orange sauce, and blueberry sorbet (that sat on top of a meringue petal).


Okay so i know these are supposed to be desserts, but every once in a while we would make some savory things. So this next photo is of a savory jalousie. Jalousie means blinds in french, so its referring to the slits in the jalousie which are supposed to look like blinds. Jalousies are basically just a puff pastry case and can be filled with anything you like, either sweet or savory.

This one was filled with sauteed shallots, garlic, spinach, crimini mushrooms, button mushrooms, and goat cheese. It was served with a bechamel sauce which is basically butter and flour cooked together to make a thick paste, then the milk is added to thin it out. Its a great base sauce for many things, and you can add whatever spices you feel are appropriate to accompany many dishes. We used salt, pepper, chives and nutmeg as flavors in ours. I really liked this one it was quite tasty.


This next one again isn't really much of a plated dessert in my opinion, however i do think it would make an amazing appetizer.

Here we have a base of puff pastry thats been topped with a goat cheese spread we made with goat cheese, honey, and thyme. Then on top are thinly sliced figs, then drizzled with more honey and sprinkled with thyme (this was then placed in the oven for a minute to warm it). It was served with a port wine reduction, and caramelized figs on the side (fig slices coated with sugar then a torch taken to them :) fun).


Here is one of my favorite books on plated desserts if you're interested

Stay tuned there will be more posts with many more plated desserts soon!


Sunday, May 16, 2010

Sugar Cookies

The other night i made some sugar cookies. I love soft sugar cookies, when they have the chunk sugar. So i used wiltons rainbow sparkling sugar.

I love this sugar, i use it for lots of things, its what i use for my favorite vegan margarita cupcakes.
So here is a recipe for these simple soft sugar cookies, and there drop cookies so there's no rolling involved which is always a plus.

Ingredients:
  • 8 ounces (1 cup) butter, softened
  • 1 cup sugar
  • 3/4 cup confectioners, sugar
  • 2 large eggs
  • 1 cups canola or vegetable oil
  • 2 teaspoons vanilla extract
  • 1 teaspoon baking soda
  • 1 teaspoon cream of tartar
  • 1/2 teaspoon salt
  • 4 1/4 cups all-purpose flour
  • 1/2 cup colored sugar or sprinkles


Directions:
  • Preheat oven to 325 degrees F.
  • Prepare baking sheets by lining with parchment paper or spraying with vegetable shortening.
  • Using a stand mixer, beat butter until creamy. Add sugar and confectioners' sugar and continue beating until nice and fluffy. Scrape bowl. Add eggs one at a time and beat after each addition. Mix in vanilla.
  • On low-medium speed, mix in canola oil. Scrape bowl again. Add baking soda, cream of tartar and salt and blend well.
  • With mixer on low speed, add flour 1 cup at a time. Beat well, and scrape sides of bowl making sure to get down to the very bottom.
  • Chill the dough for 30 minutes before scooping and baking.
  • Have the colored sugar ready in another bowl or two, or combine the two sugars in one bowl. Using a cookie scoop or tablespoon, measure out dough, roll into balls and coat completely in colored sugar or sprinkles. Place on prepared baking sheets, leaving room for the cookies to spread.
  • Bake at 325 degrees F for 8-10 minutes or until the outside of cookies feel slightly firm to the touch.
  • Remove and cool on racks before storing in airtight containers.


  • I managed to control myself long enough to take a few photos :)

    I love these cookies, there the perfect soft chewy cookie, with the sugar giving it a nice crunch

    Saturday, May 15, 2010

    Tinkerbell Cake

    This is part 2 of my post about the tinkerbell baby shower cake i did. The customer was buying this cake for her best friend who was expecting a little girl. They had decorated the nursery with all tinkerbell things, so the customer decided she wanted a tinkerbell themed cake, and she wanted the little girls name on it (Addison).

    This first photo is of the plaque i made for the cake. This was a gumpaste cut-out that i dried on the side of a cake pan so it would dry curved. Then once it was dry i painted the little girls name on it using silver petal dust (mix with a small amount of clear alcohol such as vodka or lemon juice). Then once that is dry i piped an outline of royal icing, then placed little pearl sugar sprinkles on the royal icing.


    Heres a photo of the cake almost complete, it's just missing tinkerbell at the top (i didn't put her on top until after the cake had reached its destination)

    So here a little more info about the cake. It was a 3 tiered vanilla cake, with rasberry filling, and vanilla buttercream. I then covered them with fondant, that i had colored a very pale green. Then added a white fondant border to each tier.

    The flowers and the plaque are both gumpaste


    This next picture is of the top of the cake (at the party). I made tinkerbell out of marzipan, her wings are made from gumpaste dusted with white pearl luster dust, and she is holding a small gumpaste flower. She is sitting on top of a gumpaste flower.


    Here is the cake in its entirety at the party (sadly the lighting was not very good, but the picture came out ok).
     
    Blog Template by Delicious Design Studio